RDQLPlus Tutorial
Contents
- Getting Acquainted - Entering commands, using the history browser, and navigating directories. Introducing the HELP, MODELS, LS, CD, and DIR commands.
- Drawing and Querying - How to USE, DUMP, SELECT, COUNT, and DRAW.
- Creating and Modifying - CREATE your own model and INSERT and DELETE statements. Also learn about transactions and the DROP and DETACH commands.
- Inference - How to create and work with an inference model. Learn the ALIAS, CREATEINF, and REBIND commands.
- Other Resources - Some pointers.
Note: Although all RDQLPlus commands
are case insensitive, throughout this tutorial we'll always use CAPS to refer
to them.
Getting Acquianted
After you start RDQLPlus, you'll see the two-part command window. The
top is where you type commands, and the bottom is where you see text output.
You can resize and maximize the command window, or adjust the horizontal
bar to make more room in the command or output pane without resizing the
window.

Enter HELP; in the command pane. In the output pane, you'll
see a list of commands and brief explanations of what they do (Note that
the RIDIQL command reference will tell you much
more than this). You
can scroll up in the output pane when the command output is too long to
fit in the visible part of the pane.
Try another command. Enter HMM;. You should see a red response,
"Unrecognized Command" in the output pane. RDQLPlus always prints error
messages in RED and regular output in WHITE.
You should have noticed by now that when you finish entering a command,
your text immediately disappears from the command pane and goes into the
output window in YELLOW.
Let's try one more command. Enter MODELS;. You should see the following:
Database Store(s):
  mckoi at jdbc:mckoi://localhost:9167/ has 0 model(s)
Memory Store:
  memory has 1 model(s)
    default@memory
This tells you which stores RDQLPlus is ATTACHed to, and which models
exist in each store. By default, there are are two stores, "mckoi" and "memory".
The memory store has a model called "default", identified by "default@memory".

Pressing UP and DOWN will navigate through all the history items.
If you want use a history item as a template for a new command, select
it and press SPACE. See how it immediately closes the history window
and puts the text in the command pane?
To re-execute a history as-is, just hit ENTER when it's showing.
The history window immediately closes and the command is executed.
Look at the title bar of the command window. It should look like the image below. This always tells you
which model you're using, what directory you're in, and whether you're in auto-commit mode:

What's that ~ (tilde) at the end? It's a short way of saying you're in the "start"
directory of the RDQLPlus distribution. This is where RDQLPlus always starts you out.
It contains a "sample" directory with some filesystem-based stores that this
tutorial will use later. You can also use it as a work area.
You can navigate and view directories with the CD and LS commands. Go ahead
and navigate to samples/simple. The two files you see there will be used
in the next section. Curious about what's inside? Try the CAT command
on one of them.
Drawing and Querying
If you're not already in the samples/simple directory, go there now: CD samples/simple;
Now, ATTACH this directory with the command:
ATTACH simple .; This attaches the current directory (.) as
a store with the name, "simple".
Now when you run the MODELS command, you should see something like:
Filesystem Store(s):
  simple at C:\rdqlplus\dist\start\samples\simple has 2 model(s)
    graph1.rdf@simple
    graph2.rdf@simple
Database Store(s):
  mckoi at jdbc:mckoi://localhost:9167/ has 0 model(s)
Memory Store:
  memory has 1 model(s)
    default@memory
To switch the current model, type USE graph1.rdf@simple;
You should now see from the titlebar that the current model is graph1.rdf@simple.
If you want to list the statements in the current model, you can use
the DUMP command. Try DUMP N;.
You should see one statement, in N-TRIPLES format. A much more interesting
way to view the graph is via the DRAW command.

Most RDF graphs are much more complex than this, and it's useful to
zoom and pan on the image. Try this: Hold the mouse pointer over
the image, hold down the RIGHT mouse button, and drag down. You should
see the graph zoom out. Do the same thing, but drag UP to zoom in.
For panning, you can hold down the LEFT mouse button and drag in the
direction you want to pan. You can also use the arrow keys on the
keyboard to pan. You should familiarize yourself with these controls:
you'll likely use them when working with bigger graphs.
Notice that the statusbar at the bottom of the RDQLPlus window also
tells you how to zoom and pan if you forget.
Now try drawing the graph2.rdf graph in the simple store with:
USE graph2.rdf@simple;, then DRAW;. As you can see, this
one has a few statements.
Let's check out the SELECT command.
Say you want to know what the graph's creator's last name is.
Here is a query that would do the trick:
SELECT ?last
WHERE  (<ns:thisGraph> <ns:wasCreatedBy> ?who)
       (?who <ns:lastName> ?last);
After entering this query, you should see:
last
========
"Wilper"

You should have noticed that the graphical results have more information
than the text results. That's because a regular SELECT query only
provides exactly the things you ask for in the SELECT clause. When DRAWing a query, we
want to give you a sub-graph of the original graph... and in order to
do that, we give you a graph of all statements involved in the query.
Let's do another query, this time on a more complicated graph.
Attach the samples/friends directory as "friends", then switch to the
ourfriends.rdf model in that store. This graph is a merging of
myfriends.rdf and bobsfriends.rdf in the friends store.
You might ask the question,
what friends do we have in common? Try this:
SELECT ?friend
WHERE  (<person:Chris> <prop:hasFriend> ?friend)
       (<person:Bob> <prop:hasFriend> ?friend);
One last thing before we end this section. Sometimes you want to see
how many results a query would return without actually listing them.
RDQLPlus provides a COUNT command that
can be used for this. Try it on the above query by prepending the query
with COUNT. You should see:
2 result binding(s), with 2 subject(s) and 4 statement(s) involved in query.The "result bindings" tells you how many rows would be returned from a query. The "involved" part tells you about the subgraph of involved statements. Now try COUNT; by itself. It will respond with:
2 subject(s), 11 statement(s), 0 reified statement(s).This tells you about the entire graph.
Creating and Modifying
You can create models from scratch using the CREATE
command. Let's create a new model in the "friends" store. Type
CREATE yourfriends.rdf@friends; Then switch to this new model.
Pretend you're friends with George, David, and Cathy with the following:
INSERT <person:You> <prop:hasFriend> <person:George>
       <person:You> <prop:hasFriend> <person:David>
       <person:You> <prop:hasFriend> <person:Cathy>;
Next, use the same syntax, but add a couple of your real-life friends.
Since you're using a file-backed model, you're automatically in a transaction.
This means you need to COMMIT your changes
before RDQLPlus will save them to disk. Type COMMIT; now. Note that
if you make a mistake while changing the data of a model (like when INSERTing
statements), you can roll back to the previous commit point by ABORTing.
Note: In file-backed models you're always in a transaction, so you never need to begin
one. But with memory and
database-backed models, you are normally auto-committing (not in a transaction).
When working with a model in a database that supports it, you
can use the BEGIN command to start a
new transaction.
Let's get back to the friends models. You should now have a graph that
represents your friends. But it's not very interesting by itself.
Let's create a new model -- this time in memory, in which to merge all
friend information we know about. Type CREATE allfriends@memory;
Then USE allfriends@memory. Next, to get a graph like that
on the right, use the INSERT command to
merge everything together:
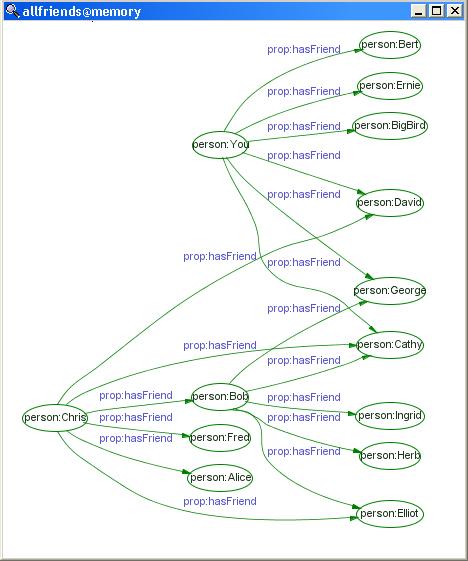
INSERT FROM myfriends.rdf@friends;
INSERT FROM bobsfriends.rdf@friends;
INSERT FROM yourfriends.rdf@friends;
What kinds of things can we do with such a graph? One obvious question we can ask is, "What friends do we all have in common?" The answer is given by the following RDQL:
SELECT ?friend
      WHERE (<person:Chris> <prop:hasFriend> ?friend)
            (<person:Bob> <prop:hasFriend> ?friend)
            (<person:You> <prop:hasFriend> ?friend);
You'll find that we all share person:Cathy as a friend. Now, what about the
opposite of this question: "What friends don't we all share?". Here's
one approach to answering this question: Think of it as a set problem.
We already have a query that yeilds a set of statement that we're NOT interested
in. And the whole graph represents the set of statements that we might be
interested in. If we subtract the things we're not interested in, we get
the set of statements we ARE interested in.
We can use the DELETE statement to do
this subtraction. First, make a copy of the entire allfriends@memory graph,
called notcommon@memory by using the CREATE, USE, and INSERT commands.
Next, issue the statement:
DELETE SELECT ?friend
      WHERE (<person:Chris> <prop:hasFriend> ?friend)
            (<person:Bob> <prop:hasFriend> ?friend)
            (<person:You> <prop:hasFriend> ?friend);
Now let's say we're no longer interested in the fact that "Chris hasFriend Bob"
and "Chris hasFriend Fred". Here's how we can remove specific
statements:DELETE <person:Chris> <prop:hasFriend> <person:Bob>
<person:Chris> <prop:hasFriend> <person:Fred>;
When you're no longer interested in a model, you can DROP it for good. Go ahead
and remove the memory-backed models you've created with DROP allfriends@memory;
and DROP notcommon@memory.
For the rest of the tutorial, we also won't be using the "friends" or "simple" stores.
We can DETACH them by entering DETACH friends;
and DETACH simple;. This won't remove them -- it will just make them
absent in the list yeilded by the MODELS; command. You can re-attach
them any time.
Inference
Two models have already been created for this exercise. You'll find
them in the samples/inference directory. ATTACH this directory as
"inf", and USE the models and take a look at them. They're very simple:
the family.rdf model has a couple "hasSibling" statements,
and and family.owl model has a couple statements about the "hasSibling" property.
It says it's both transitive and
symmetric.

You should have noticed that the hasSibling property is completely
spelled out, whereas previously we've been using shorter names for
properties. This is a good time to learn about the ALIAS command.
You can create an alias, "family", which is short for "http://www.example.org/family#".
From then on, anytime you refer to family:hasSibling, it will be correctly
expanded by RDQLPlus so, while you're really working with the full URI of
"http://www.example.org/family#hasSibling", you don't have to type the whole
thing out. Also, aliases will be used in output when DRAWing.
So before we move on, enter the following: ALIAS family http://www.example.org/family#;
Now if you list aliases with ALIAS; you'll notice your new one is there.
Let's create an inference model over the ontology and source data.
This can be done with the CREATEINF command: CREATEINF faminf OWL_LITE_RULE family.owl@inf family.rdf@inf;
When you're done running this command, USE faminf@memory (all inference models
are stored in memory). Do a COUNT.
You'll notice this model has a lot more statements than we're interested in!
If you DRAW it (only recommended on fast machines, as you could end up waiting
for a bit), you'll notice it looks like the picture above and to the right.
Here's a way to look at only the statements we care about:
DRAW SELECT ?who ?whom
     WHERE (?who <family:hasSibling> ?whom)
     AND   ?who NE ?whom;
This should yield something like:

See all those extra statements? They were inferred by applying the
logic encoded in the ontology to the actual instance data. All we have
to do is connect a person via a hasSibling statement and the other
statements follow. Now let's try adding a couple statements to the
original model. Type the following:
USE family.rdf@inf;
INSERT <person:Debbie> <family:hasSibling> <person:John>
       <person:Debbie> <family:hasSibling> <person:Andy>
COMMIT;
USE faminf@memory;
One last thing: type REBIND; REBINDing
will cause the inference model to take the new data into account.
Now when you draw it again using the above DRAW command, you should see
something like:

Other Resources
Some good RDQL-related resources:
Some good RDF ontology and inference-related resources: